Introduction to AdTech: The Invisible Auction and its Participants
Welcome to the first part of our AdTech primer. For most developers, modern advertising technology is a black box of invisible network requests. In this post, we’re cracking it open to understand the high-speed marketplace that powers the internet.
1. The Problem: Scaling the Manual Deal
In the early days of the web, if a company wanted to advertise, they had to call a website’s sales team, negotiate a price, and manually send over image files. While manageable for a few niche sites, this manual approach cannot scale to the billions of pages and trillions of impressions available today.
Modern advertising solves this through Programmatic (Advertising) - the use of automated software, data, and algorithms to buy and sell digital ad inventory. It streamlines a process that once took weeks into a workflow that typically completes within a 100-200 millisecond budget to avoid slowing down the user’s experience. That figure is a representative envelope, not a universal guarantee: the exact ceiling depends on the exchange, the number of bidders called, and the timeout each buyer is given.
How RTB Relates to Programmatic
While often used interchangeably, it is technically more accurate to view Programmatic as the overarching category of automated buying. Real-Time Bidding (RTB) is the specific mechanism or protocol used within programmatic to conduct an instantaneous auction for each individual impression.
Think of programmatic as the “automation of the transaction”, while RTB is the “dynamic price discovery engine”. Not all programmatic deals happen via auction as some are fixed-price automated deals, but RTB is what enables the hyper-targeted, high-frequency “spot market” that defines the modern web.
2. Meet the Players: The Buy and Sell Sides
To understand the auction, we must first understand the platforms that act as the interface for both sides of the market.
a. The Demand-Side Platform (DSP)
At its core, a DSP allows advertisers to manage their ad campaigns across multiple ad exchanges/marketplaces where publishers make their ad inventory available - all through a single interface. This eliminates the need for manual negotiations with individual websites and provides powerful tools for targeting, bidding and optimization.
The magic happens through RTB. In the milliseconds it takes for a webpage to load, an auction takes place for the available ad space. The DSP analyses the data associated with the user visiting the page and decides whether to bid on that ad impression and how much to offer.
- Core Function: Analyzes user data (location, history etc.) and page context to calculate the optimal bid for a specific impression.
- Prominent Players (examples current as of writing; the vendor landscape shifts, so treat market-share adjectives as a snapshot rather than a fixed ranking):
- Google Display & Video 360 (DV360): A major enterprise choice, deeply integrated with the Google ecosystem.
- The Trade Desk: A large independent DSP, known for its extensive reach across the “open internet” outside of Google.
- Amazon DSP: Leverages Amazon’s first-party shopper data to target users based on purchase intent.
A Step-by-Step Example: Urban Hiker and their New Boot Launch
Let’s illustrate this with our hypothetical company Urban Hiker, which is launching a new waterproof hiking boot. Their target audience is city-dwelling millennials in India who have an interest in outdoor activities and sustainable fashion.
Here’s how Urban Hiker would use a DSP to run their advertising campaign:
Step 1: Campaign Setup in the DSP
The marketing team at Urban Hiker logs into their chosen DSP (popular examples include Google Display & Video 360, The Trade Desk, or Amazon DSP). They create a new campaign and define their objectives: driving traffic to their product page and increasing online sales. They set their overall budget, the campaign duration, and upload their ad creatives: eye-catching banners and short video ads showcasing the new boots.
Step 2: Defining the Target Audience
This is where the power of the DSP shines. Urban Hiker doesn’t just buy ad space on random websites, they target specific individuals. They set up their targeting parameters within the DSP, which can include:
- Demographics: Age (25-40), Location (major Indian cities like Mumbai, Delhi, Bangalore).
- Interests and Behaviours: Users who have recently searched for “hiking trails near me”, “sustainable footwear” or have visited websites related to outdoor gear and travel blogs.
- Contextual Targeting: Placing ads on web pages with content about hiking, trekking, and eco-friendly products.
- Retargeting: Targeting users who have previously visited the Urban Hiker website but didn’t make a purchase. They can even target those who added the new boot to their cart but didn’t check out.
Step 3: The Real-Time Bidding (RTB) in Action
Now, a potential customer, let’s call her Priya, a 30-year-old from Bengaluru who has been researching weekend treks, opens a popular travel blog on her laptop. Here’s what happens in the background within milliseconds:
- Ad Request: The travel blog’s website sends a request to a Supply-Side Platform (SSP), which is the publisher’s equivalent of a DSP. The SSP announces that it has an ad impression available and provides pseudonymous and contextual signals about Priya (her coarse location, device type, the page she is on, and, subject to consent and platform policy, advertising or pseudonymous identifiers). These are not “anonymized” in any strong sense: fields like IP address, device attributes, and identifiers can remain linkable or re-identifying when combined, which is why they sit at the center of the privacy questions we return to later.
- Auction Begins: The SSP passes this information to an Ad Exchange, which acts as a massive digital marketplace. The ad exchange then sends out a bid request to multiple DSPs, including the one used by Urban Hiker.
- DSP Analysis and Bidding: Urban Hiker’s DSP receives the bid request and instantly analyses Priya’s data. It recognizes that she fits their target audience perfectly: she’s in the right location, the interest segments attached to the request indicate hiking, and she’s on a relevant website. Based on the rules set by the Urban Hiker team, the DSP calculates a bid amount - the maximum they are willing to pay to show their ad to Priya.
- Winning the Auction: The ad exchange receives bids from various DSPs representing different advertisers. The highest bidder wins the auction. Let’s say Urban Hiker’s DSP placed the winning bid.
- Ad Served: The ad exchange informs the SSP, which then instructs the travel blog’s website to display Urban Hiker’s ad for the new waterproof boots to Priya. This entire process, from Priya opening the blog to the ad appearing, happens in the blink of an eye.
Step 4: Campaign Optimization and Reporting
The work of the DSP doesn’t stop once the ad is shown. It continuously tracks the performance of the campaign. The Urban Hiker marketing team can log into their DSP dashboard at any time and see a wealth of data:
- Impressions: How many times their ad has been shown.
- Clicks: How many users clicked on their ad.
- Click-Through Rate (CTR): The percentage of impressions that resulted in a click.
- Conversions: How many users who saw the ad went on to purchase the boots.
- Cost Per Acquisition (CPA): How much they are spending on advertising for each sale.
Based on this data, the DSP and the marketing team can make real-time adjustments. If a particular website is delivering a lot of clicks but no sales, they can exclude it from their campaign. If video ads are performing better than static banners, they can allocate more of their budget towards video. This constant optimization ensures that Urban Hiker’s advertising budget is being spent as effectively as possible to reach the most relevant audience and achieve their business goals.
In essence, a DSP provides advertisers like Urban Hiker with a powerful and efficient way to navigate the vast and complex digital advertising landscape, ensuring their message reaches the right people at the right time, and at the right price.
b. The Supply-Side Platform (SSP)
Let’s extend the Urban Hiker example to understand the crucial role of the Supply-Side Platform (SSP).
If the Demand-Side Platform (DSP) is the advertiser’s best friend, the Supply-Side Platform (SSP) is the publisher’s loyal and hardworking agent. They are two sides of the same coin, working together to make the real-time advertising market function.
A publisher is any website or app owner who wants to make money by selling ad space on their property. The SSP is the technology that allows them to do this automatically, efficiently, and at the best possible price.
- Core Function: Connects a publisher’s site to multiple ad exchanges, sets “Floor Prices” to prevent inventory from being undersold, and enforces creative-quality controls (category blocks, malware scanning, publisher-suitability rules) so unwanted ads never render. Note that “brand safety” is principally a buyer-side concern - an advertiser avoiding unsuitable pages - while the equivalent seller-side job is this creative-quality gatekeeping. An SSP’s aim is to raise a publisher’s yield through competition, not to guarantee the single highest possible price on every impression.
- Prominent Players:
- Google Ad Manager (GAM): A hybrid giant that functions as both a publisher ad server and an SSP.
- Magnite: Formed from the merger of Rubicon Project and Telaria, it is one of the largest independent SSPs.
- OpenX: Known for its high-scale global exchange and early leadership in header bidding technology.
Back to our Example: Meet Wanderlust Weekly
Let’s revisit our scenario. The potential customer, Priya, is browsing a popular travel blog called Wanderlust Weekly. This blog is the publisher. The owner of the blog, let’s call him Amit, wants to earn revenue from his content by displaying ads.
However, Amit is a writer, not an ad sales expert. It would be impossible for him to manually negotiate with thousands of potential advertisers like Urban Hiker. This is where his SSP comes in.
Here’s how the SSP works from the publisher’s (Amit’s) perspective:
Step 1: Inventory Management via the SSP
Amit has signed up with an SSP (popular examples include Google Ad Manager, Magnite, or OpenX). He has integrated the SSP’s code into his Wanderlust Weekly website. Within his SSP dashboard, Amit has control over his ad inventory. He can:
- Set the Rules: Amit can define which types of ad spaces are available (e.g., a leaderboard banner at the top, a rectangle ad in the sidebar).
- Establish Price Floors: He can set a minimum price for his ad slots. This is a crucial feature that prevents his valuable ad space from being sold for too little. For instance, he might set a floor price of \$0.50 CPM (Cost Per Mille, or cost per thousand impressions), ensuring he never receives less than that amount.
- Manage Brand Safety: Amit can create blocklists to prevent certain categories of ads (e.g., from his direct competitors, or sensitive categories like gambling) from ever appearing on his travel blog, protecting his brand’s reputation.
Step 2: Connecting to the Demand
The primary job of Amit’s SSP is to connect his available ad inventory to as many potential buyers as possible. The SSP plugs Wanderlust Weekly into multiple Ad Exchanges, which are the massive marketplaces where DSPs come to buy.
By connecting to a wide pool of buyers, the SSP creates a competitive environment. More bidders mean higher demand, which drives up the price for Amit’s ad space and maximizes his revenue.
Step 3: The Real-Time Auction (From the SSP’s Side)
This is the flip side of the process we saw with the DSP. When Priya lands on the “Wanderlust Weekly” homepage, the following happens from the SSP’s point of view:
- Impression Becomes Available: The moment the page starts loading, Amit’s SSP recognizes there’s an ad impression up for grabs. It gathers the available pseudonymous and contextual signals about the user (Priya) and the context of the page (a travel blog).
- Sending the Bid Request: The SSP packages this information and sends out a bid request to the ad exchange. It essentially announces: “I have a premium ad spot on a travel blog about to be seen by a user in Bangalore who is interested in outdoor activities. What am I offered?”
- Receiving and Evaluating Bids: The ad exchange broadcasts this request to numerous DSPs. In our example, the DSP for Urban Hiker recognizes this as a perfect match and submits a high bid. Other DSPs representing different brands (perhaps another shoe company, a travel agency, or a credit card company) also submit their bids. The SSP receives all these bids in milliseconds.
- Selecting the Winner: The SSP analyses the incoming bids and instantly identifies the highest one - in this case, the bid from Urban Hiker’s DSP.
- Ad Delivery Confirmation: The SSP confirms the winning bid and passes the ad creative (the Urban Hiker boot ad) back to Amit’s website. The ad is then displayed to Priya as the page finishes loading.
Step 4: Revenue and Reporting for the Publisher
Just as the DSP gives advertisers performance data, the SSP provides Amit with a detailed dashboard. He can see:
- Fill Rate: The percentage of his ad requests that were successfully filled with an ad.
- RPM (Revenue Per Mille): The average revenue he is earning for every 1,000 ad impressions.
- Top Performing Ad Units: Which ad slots on his site are making the most money.
- Demand Partners: Which advertisers (or their DSPs) are buying the most of his inventory.
This data allows Amit to optimize his content and ad strategy to further increase his earnings.
Summary: DSP and SSP Working in Harmony
The digital AdTech ecosystem is a perfect example of a two-sided market, seamlessly connected by technology.
- The Advertiser (Urban Hiker) uses a DSP to define who they want to reach and how much they’re willing to pay. The DSP’s goal is to buy the most effective ad impressions at the lowest possible price.
- The Publisher (Wanderlust Weekly) uses an SSP to manage their ad space and connect to a wide range of buyers. The SSP’s goal is to sell ad impressions to the highest bidder to maximize revenue. These two platforms meet in the middle (the Ad Exchange) to conduct a lightning-fast auction, ensuring that the advertiser reaches their target audience and the publisher earns the most money for their valuable content.
c. The Ad Exchange
The Ad Exchange is the digital trading floor where the DSPs and SSPs meet. It is the technology layer that facilitates the actual real-time auction, receiving bid requests from SSPs and broadcasting them to hundreds of DSPs simultaneously.
- Core Function: Matches supply and demand in milliseconds, identifies the highest compliant bidder, and manages the clearing of the transaction.
- Prominent Players:
- Google AdX: The auction engine integrated directly into Google Ad Manager.
- Xandr (formerly AppNexus): Now part of Microsoft, it offers a massive global exchange with sophisticated technical controls.
- Index Exchange: A neutral, independent exchange favored by premium publishers for its focus on transparency and high-quality inventory.
One caution before we move on: it is tempting to picture a fixed pipeline of Advertiser → DSP → Exchange → SSP → Publisher, with a separately operated exchange as a mandatory neutral box in the middle. Reality is messier. An SSP may run its own exchange, an exchange may be fused with a publisher’s ad server, header bidding can create an upstream auction in the browser, and reselling can add several intermediaries. A more honest mental model is a functional chain - advertiser → DSP → one or more buying/selling intermediaries → SSP/exchange → publisher ad server → browser - where the actual ownership and routing vary from one impression to the next.
Everyone’s view of the same auction
Each participant sees only a slice of the transaction. This asymmetry - who controls what, who observes what, and what each party can never see - is worth holding onto, because most of the interesting problems later in the series live in these gaps.
| Participant | Controls | Observes | Optimizes | Does not know |
|---|---|---|---|---|
| Advertiser | Goal, budget, creative | Reported delivery and outcomes | Business result | Full supply path; counterfactual sales |
| DSP | Eligibility and bid | Request signals, auction feedback | Buying objective under constraints | All competitors’ bids |
| SSP / exchange | Routing, auction, floors | Returned bids, supply context | Seller yield | Advertiser’s true valuation |
| Publisher | Inventory and rules | Page and ad request, line items | Contracts and yield | Full buyer decision logic |
| User / browser | Consent and settings | The rendered experience | Not an optimizer | Most downstream data sharing |
3. Anatomy of a Millisecond: The RTB Walkthrough
Let’s look at a real-world scenario. Urban Hiker, a company launching new waterproof boots, wants to reach city-dwelling millennials in India.
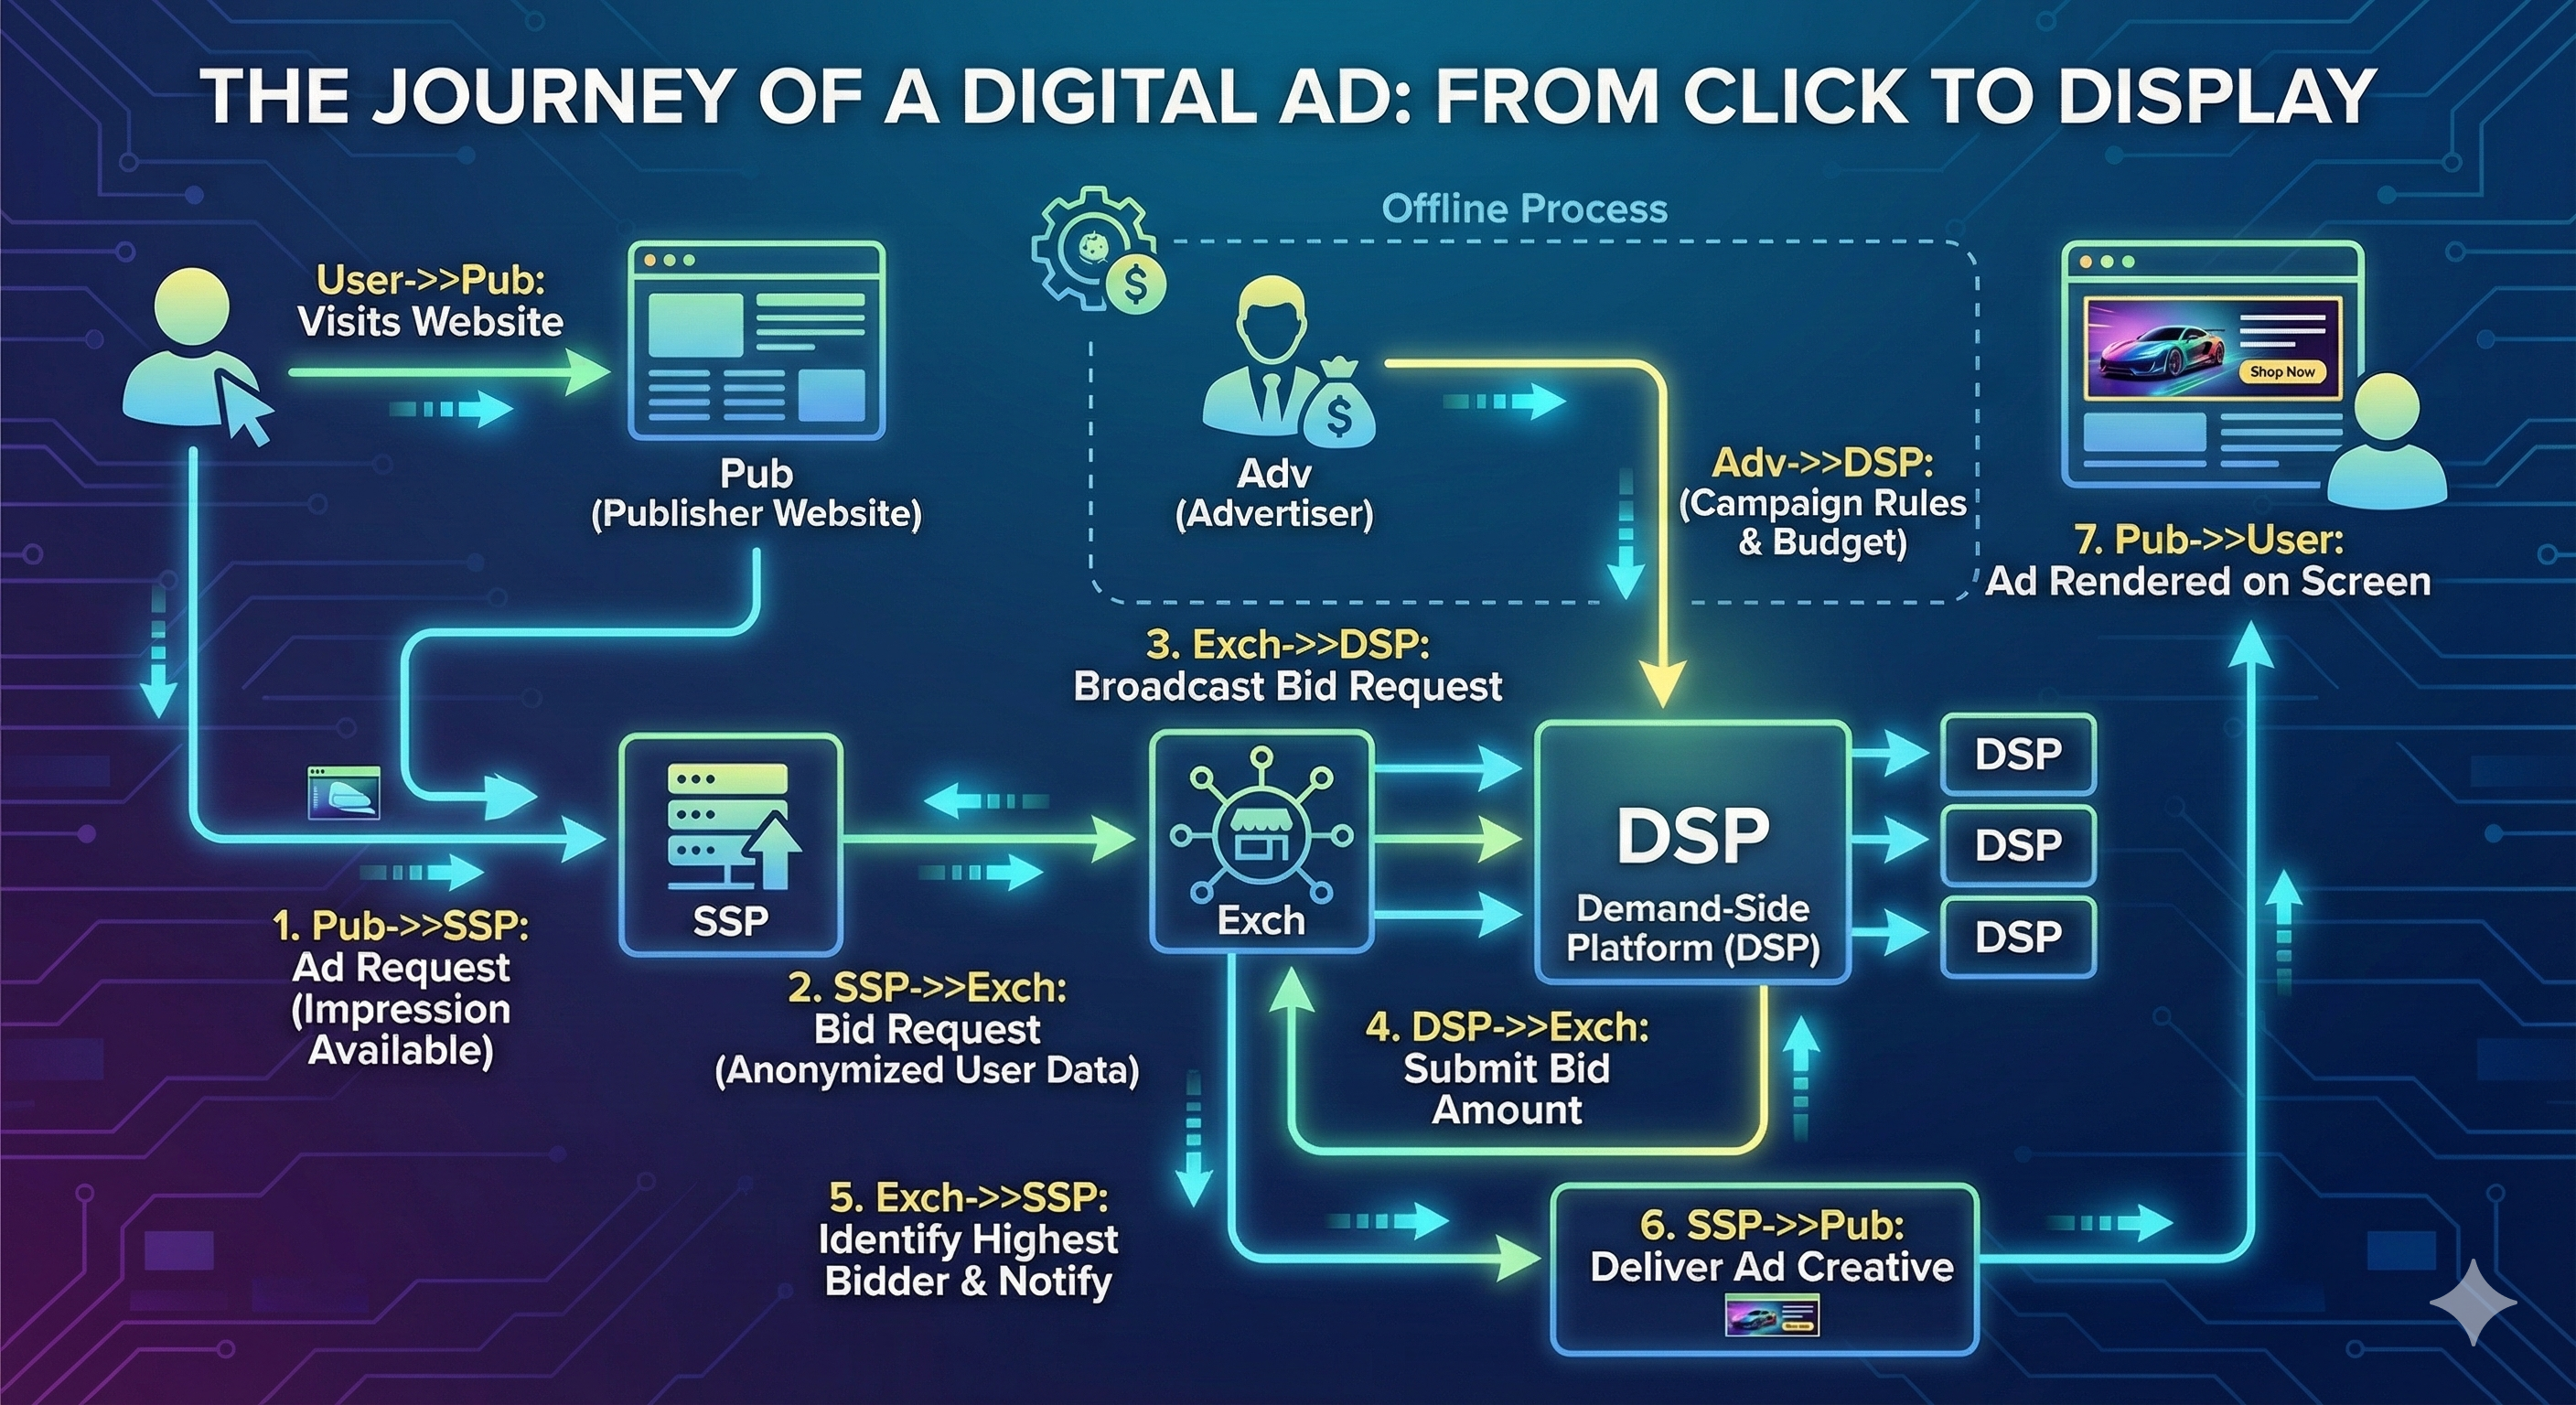
At 12:32 PM, a user named Priya in Bengaluru opens a travel blog called Wanderlust Weekly. In the time it takes for her page to load, the following happens:
- Ad Request: The blog’s website sends a request to the SSP. The SSP packages pseudonymous and contextual signals about Priya - her coarse location, her device, and the fact she’s reading a travel blog.
- The Auction Opens: The SSP passes this info to the Ad Exchange, which broadcasts a “bid request” to multiple DSPs.
- The Decision: Urban Hiker’s DSP receives the request. It recognizes Priya as a high-value target because of her browsing history and location.
- Bidding: Using its bidding logic - typically a machine-learned value model, sometimes a simpler heuristic - the DSP estimates how much this impression is worth to Urban Hiker and submits a bid (e.g. ₹7.50). The submitted bid is usually CPM-denominated (a price per thousand impressions) even when the advertiser is really optimizing toward a downstream goal like cost-per-acquisition or ROAS.
- Selecting the Winner: The Ad Exchange receives bids from various advertisers and awards the slot to the winning bid. Crucially, highest bid does not automatically mean winner: eligibility, creative policy, brand-safety and category rules, private deals, quality or rank adjustments, floor prices, and timeouts all gate who can win. A first-price winner typically pays its bid, but platform fees and currency conversions still sit between that number and what the publisher actually banks.
- The Reveal: The ad is served, and Priya sees the new Urban Hiker boots on her screen.
What actually crosses the wire
The “bid request” above is not a vague bundle of data - it is a structured message, most commonly in the OpenRTB format that the industry standardizes on. A deliberately reduced version of the request for Priya’s impression looks like this:
1
2
3
4
5
6
7
8
9
10
11
12
13
14
{
  "id": "auction-8f3a1c",
  "imp": [{
    "id": "slot-1",
    "banner": {"w": 300, "h": 250},
    "bidfloor": 70.0,
    "bidfloorcur": "INR"
  }],
  "site": {"domain": "wanderlust.example", "page": "https://wanderlust.example/weekend-treks"},
  "device": {"devicetype": 2, "geo": {"country": "IND", "city": "Bengaluru"}},
  "user": {"id": "pseudonymous-or-absent"},
  "regs": {"gpp": "consent-signal-string"},
  "source": {"schain": {"complete": 1, "nodes": []}}
}
Only a few fields matter for this introductory flow: imp describes the slot and its floor price (₹70 CPM here); site and device carry the context and coarse location that make the impression targetable; user carries an identifier only when consent and policy permit and is frequently absent or pseudonymous; and regs/source carry consent and supply-chain signals we will unpack in later articles. We devote a full article later in the series to reading an OpenRTB request and response field by field; for now, note only that everything the buyer knows about Priya arrives inside a message like this. The format is maintained as a living standard by the IAB Tech Lab, not a frozen PDF.
4. Understanding Metrics on Both Sides
With the SSP acting as the publisher’s gatekeeper and the DSP as the advertiser’s strategic buyer, the technical machinery for the auction is complete. But in this high-frequency market, how do both sides keep score? Because the goals of the advertiser/buyer (minimizing cost) and the publisher/seller (maximizing yield) are inherently different, the industry uses a specific set of standardized metrics to translate these competing interests into a common language of value.
In this section, we’ll break down the “Big Four” metrics: CPM, eCPM, ROAS and RPM, to see how they connect in a real-world campaign.
CPM (Cost Per Mille)
- Definition: CPM is a pricing model used by advertisers to buy ad inventory. An advertiser agrees to pay a fixed price for every 1,000 impressions of their ad. It is a way to buy media.
- Perspective: Advertiser
- Formula: Total Cost = (Total Impressions / 1000) * CPM Rate
- Example: Urban Hiker agrees to pay a news website a CPM of ₹150. If the ad is shown 2,000,000 times, the total cost is fixed and known upfront: (2,000,000 / 1000) * ₹150 = ₹300,000.
eCPM (Effective Cost Per Mille)
- Definition: eCPM normalizes any campaign’s cost (or, on the sell side, revenue) into a common currency: the effective amount per 1,000 impressions. It is most useful for campaigns not bought on a CPM basis (e.g., Cost Per Click - CPC), placing them on one comparable axis. Despite the name, eCPM is used on both sides of the market: a buyer computes an effective cost per mille, and a seller computes an effective revenue per mille to rank competing demand.
- Perspective: Advertiser and publisher (effective cost on the buy side, effective revenue on the sell side)
- Formula: eCPM = (Total Cost / Total Impressions) * 1000
- Example: Urban Hiker runs a campaign on a travel blog, paying ₹10 per click (CPC). The campaign gets 500 clicks from 50,000 impressions.
- Total Cost = 500 clicks * ₹10/click = ₹5,000.
- Urban Hiker’s eCPM = (₹5,000 / 50,000) * 1000 = ₹100.
- This allows Urban Hiker to compare the cost of this CPC campaign directly against other campaigns.
ROAS (Return on Ad Spend)
- Definition: ROAS is a primary performance metric used by advertisers to measure the gross revenue earned for every unit of currency spent on advertising. It answers the fundamental question: “For every ₹1 I put into this campaign, how many rupees did I get back?”.
- Perspective: Advertiser.
- Formula:
ROAS = Total Revenue Generated from Ad Campaign / Total Cost of Ad Campaign. - Example: Urban Hiker spends ₹1,15,000 on a campaign for their new trekking jackets. The campaign generates ₹4,50,000 in total sales.
- Urban Hiker’s ROAS = ₹4,50,000 / ₹1,15,000 = 3.91.
- Interpretation: This is expressed as a 3.9:1 ratio, meaning every ₹1 spent generated ₹3.90 in revenue.
How ROAS Relates to GMV
In the world of e-commerce and retail AdTech, GMV (Gross Merchandise Value) is the total sales value for merchandise sold through a platform over a specific period.
The relationship is straightforward. The “Total Revenue” used in the ROAS formula is the portion of the GMV that can be directly attributed to the ad campaign, i.e. the Attributed GMV. If a user clicks an ad and buys a ₹2,500 jacket, that ₹2,500 is added to the campaign’s attributed GMV.
- The Calculation:
ROAS = Attributed GMV / Ad Spend.
One caveat deserves emphasis, because it recurs throughout AdTech: attribution assigns credit; it does not prove causation. ROAS counts the revenue an attribution model credits to the campaign, not the revenue the campaign actually caused. Priya might have bought the boots anyway after seeing the brand elsewhere; a last-click model would still hand the ad full credit. Measuring genuine incremental lift requires a holdout or experiment, a problem we return to in a later article. For now, read ROAS as “attributed return,” never as “return the ad created out of nothing.”
Essentially, ROAS measures the efficiency of turning ad spend into GMV. While a high ROAS indicates a successful top-line revenue driver, advertisers must balance it against profit margins. If the cost of goods and operations exceeds the revenue generated, even a high ROAS might not result in a positive ROI (Return on Investment).
RPM (Revenue Per Mille)
- Definition: RPM is a performance metric used by publishers (the website or app owners) to measure their ad earnings per 1,000 of something, regardless of how the ads were sold. The “something” is a denominator that must be named explicitly: impression RPM divides by ad impressions, but publishers also track page RPM (per 1,000 page views) and session RPM (per 1,000 sessions), and these can differ sharply on a page that shows several ad slots. Throughout this article we use impression RPM.
- Perspective: Publisher
- Formula: RPM = (Total Earnings / Total Impressions) * 1000
- Example: A travel blogger shows ads on their website and earns a total of ₹7,000 in a month from 200,000 impressions.
- The blogger’s RPM = (₹7,000 / 200,000) * 1000 = ₹35.
- This means for every 1,000 impressions they served, they earned ₹35.
The Connection: A Unified Example
Let’s trace a single campaign to see how all these terms relate.
The Setup
- Advertiser: Urban Hiker
- Publisher: A popular travel blog
- Intermediary: An ad network that takes a 30% fee.
The Campaign
- Urban Hiker (Advertiser) runs a CPC campaign on the blog, bidding ₹10 per click. The campaign generates 500 clicks from 50,000 impressions.
- Urban Hiker’s Analysis (eCPM):
- Urban Hiker’s total cost is 500 clicks * ₹10/click = ₹5,000.
- Urban Hiker’s eCPM = (₹5,000 / 50,000 impressions) * 1000 = ₹100.
- Urban Hiker’s takeaway: “Our effective cost for this campaign was ₹100 per thousand impressions.”
- The Publisher’s Earnings (RPM):
- The ad network takes its 30% fee from Urban Hiker’s spend: 0.30 * ₹5,000 = ₹1,500.
- The publisher’s total earnings are ₹5,000 - ₹1,500 = ₹3,500.
- The publisher’s RPM = (₹3,500 earnings / 50,000 impressions) * 1000 = ₹70.
- Publisher’s takeaway: “For every thousand impressions I showed, I earned ₹70.”
- The Business Result (ROAS & GMV) Now, let’s look at what happened after the click. Suppose out of those 500 clicks, 10 people bought a pair of “Urban Hiker” boots at ₹2,500 per pair.
- GMV (Gross Merchandise Value): 10 pairs * ₹2,500 = ₹25,000. This is the total revenue attributed to the ad campaign.
- Urban Hiker’s Analysis (ROAS): ₹25,000 (Revenue) / ₹5,000 (Ad Spend) = 5.0.
- Takeaway: “For every ₹1 we spent on this travel blog, we generated ₹5 in sales (a 5:1 ROAS).”
Two ledgers for one impression
There is a device we will lean on throughout this series, and it is worth introducing here on this small example. Every impression writes to two ledgers at once: a money ledger (who pays whom, how much, and when) and a data ledger (what information is created, copied, linked, or inferred). Reading them side by side is the fastest way to see who benefits and who is exposed at each step.
Here is the money ledger for the ₹5,000 campaign above:
| Event | Gross amount | Recipient | Caveat |
|---|---|---|---|
| Advertiser media spend | ₹5,000 | Buying platform / media account | Gross or net of DSP fee? |
| Intermediary fee (30%) | ₹1,500 | Ad network (illustrative) | Real fee stacks are deeper and vary |
| Publisher revenue | ₹3,500 | Publisher | Subject to reconciliation and invalid-traffic deductions |
And the data ledger for the same impression - the trail of information that made those payments possible:
| Stage | Data created or shared | Why | Risk |
|---|---|---|---|
| Page request | URL, slot, device and network data | Eligibility and delivery | Sensitive page or context leakage |
| Bid request | Context, consent state, identifiers if permitted | Buying decision | Cross-party linkability |
| Impression / click | Delivery IDs and timestamps | Billing and measurement | Event stitching across sites |
| Purchase | Order and value signal | Attribution and optimization | Commercial-behavior exposure |
The money ledger is what most introductions stop at. The data ledger is what makes programmatic advertising genuinely consequential, and it is the thread we keep pulling on as the series goes deeper.
Privacy and power (in brief). For any step above, five questions are worth asking, and we will ask them of every system in this series: What data is observed? Which parties receive it? What can be inferred from it? What can an individual reasonably control? What instead requires an industry, platform, or policy fix? Notice that for Priya, the honest answers are “quite a lot,” “several she never named,” “more than the raw fields suggest,” “very little through her own settings,” and “most of it.” Holding those answers next to the money ledger is the point: the value created here is real, and so is the exposure.
What’s Next?
We’ve seen how the SSP, DSP work at a high level. In our next article, we’ll dive into the internal architecture of these platforms - specifically how Ad Servers and SSPs manage inventory and Direct Deals versus programmatic auctions.