A Practical Introduction to LLM Quantization and Linear Mapping
Why Quantization Matters for LLMs
Modern LLMs are enormous, not just in parameter count, but in the memory and compute they demand at inference time. A model with billions of parameters stored in FP16 can easily require tens of gigabytes of memory, making it impractical to run on consumer GPUs, edge devices, or mobile hardware.
Quantization tackles this problem by compressing high-precision weights into lower-precision representations (e.g., INT8 or INT4). The key idea is simple: most neural network weights don’t need 16-32 bits of precision to preserve the model’s behavior. By representing them with fewer bits, we can dramatically reduce memory usage and bandwidth while keeping accuracy nearly intact.
The result is transformative:
- Smaller models that fit on limited hardware
- Faster inference due to cheaper integer operations
- Lower energy consumption, enabling on-device AI
In short, quantization is one of the main techniques that makes large language models practical to deploy in the real world.
Floating-Point Formats: The Starting Point
Before we step into the acronym zoo of quantization techniques, it pays to look at the floating-point ladder that LLM weights live on to begin with. Every quantization scheme we’re about to meet starts from one rung on this ladder (typically FP16 or BF16) and moves one or two rungs further down. Knowing what each rung gives us - and what each rung gives up - makes every later trade-off easier to read.
Anatomy of a Floating-Point Number
Any IEEE-style floating-point number is built from three pieces, following the formula:
\[\text{Value} = (-1)^{\text{sign}} \times (1.\text{mantissa}) \times 2^{(\text{exponent} - \text{bias})}\]- Sign bit (S): a single bit, positive (0) or negative (1).
- Exponent (E): controls range (magnitude). It’s stored with a “bias” so that it can encode both very large and very small numbers. More exponent bits → more orders of magnitude representable.
- Mantissa (M): controls precision (significant digits after the implicit leading 1). More mantissa bits → finer steps between adjacent representable numbers.
The total bit count $1 + E + M$ sets the format’s size. The split between $E$ and $M$ sets its personality.
This formula describes the finite normal values, the ones with an implicit leading 1. It deliberately skips the special cases every IEEE format also encodes: exact zero, subnormals (tiny values below the smallest normal, where the leading bit is 0 and precision degrades), and the reserved patterns for infinities and NaNs. Those edge cases matter in a moment, when we ask what “underflow” really means.
The Format Landscape
Here’s the full ladder, drawn proportional to bit width:
1
2
3
4
5
6
7
8
9
            S = sign bit     E = exponent bits     M = mantissa bits

FP32      | S | EEEEEEEE | MMMMMMMMMMMMMMMMMMMMMMM |    32 bits   ±3.4 × 10³⁸
BF16      | S | EEEEEEEE | MMMMMMM |                    16 bits   ±3.4 × 10³⁸
FP16      | S | EEEEE | MMMMMMMMMM |                    16 bits   ±65,504
FP8 E4M3  | S | EEEE | MMM |                             8 bits   ±448
FP8 E5M2  | S | EEEEE | MM |                             8 bits   ±57,344
INT8      | ─────── 8-bit signed integer ─────── |       8 bits   256 levels
INT4      | ─── 4-bit integer ─── |                      4 bits   16 levels
A few things worth pausing on:
- Same total bits, very different personalities. BF16 and FP16 both occupy 16 bits, but BF16 inherits FP32’s 8-bit exponent - giving it FP32’s full dynamic range at the cost of only 7 mantissa bits. FP16 spends those extra bits on precision instead, but pays for it with a much narrower magnitude range (±65,504).
- FP8 comes in two flavors. E4M3 and E5M2 make the same range-vs-precision trade-off down at the 8-bit level. E4M3 is the “forward-pass” variant (more precision), E5M2 is the “backward-pass” variant (more range, since gradients need it). NVIDIA’s H100 accelerates both.
- INT8 and INT4 are not floats at all. They have no exponent, no mantissa - just 256 (or 16) evenly-spaced integer slots over a fixed range. The move to integers is one common form of quantization, and the one this article focuses on.
What “quantization” means here. In the broadest sense, quantization maps values to a smaller discrete representational set. Integers are the most familiar target, but low-bit floating formats (FP8) and learned codebooks (NF4, which we meet next article) are quantization too. This piece drills into the workhorse case: uniform integer affine quantization. Keep the wider definition in mind, though, so “INT4 model” never reads as the only shape the idea can take.
FP16 vs BF16: The Trade-Off That Shaped Modern Training
The FP16-versus-BF16 choice illustrates the central tension we’ll see again and again in quantization: range vs precision, at a fixed bit budget.
| Format | Exponent | Mantissa | Range | Smallest positive normal | Precision |
|---|---|---|---|---|---|
| FP16 | 5 | 10 | ±65,504 | ~6 × 10⁻⁵ (subnormals to ~6 × 10⁻⁸) | ~3–4 decimal digits |
| BF16 | 8 | 7 | ±3.4 × 10³⁸ | ~1.2 × 10⁻³⁸ (subnormals to ~9 × 10⁻⁴¹) | ~2–3 decimal digits |
LLM weights are typically small (between $-1$ and $1$), so on the surface FP16’s superior mantissa precision looks like the obvious choice. But the real selector isn’t the weights themselves - it’s everything else that flows through training:
- Gradients during backpropagation routinely reach $10^{-7}$ or smaller, especially in deep networks.
- Adam’s second moment involves squared gradients, pushing those numbers even smaller still.
- Weight updates = learning_rate × gradient, often producing tiny deltas.
- Activations in certain layers can be very large.
Here is the catch. FP16’s smallest positive normal value is about $6\times10^{-5}$; below that it has subnormals down to about $6\times10^{-8}$, but with rapidly degrading precision, and many high-throughput kernels are configured to flush subnormals to zero for speed. So a gradient of $10^{-8}$ (below even the smallest subnormal) underflows to zero outright, and one sitting in the subnormal band survives only as a coarse, few-bit approximation, or gets flushed. Either way that weight stops getting a meaningful update, and training can silently stall. The standard FP16 workaround is loss scaling (multiply the loss by, say, 1024 before backprop, divide back later), which helps but is fragile, fiddly, and can still fail on tricky models.
BF16 relieves much of this pressure by keeping FP32’s full exponent range. A $10^{-8}$ gradient? Represented as a normal value. A huge activation around $10^{20}$? Still fine (BF16 tops out around $3.4\times10^{38}$). The mantissa is coarser, yes - but precision loss in a weight is often recoverable on the next gradient update, while range loss can permanently destroy gradient information. Modern training stacks (PyTorch’s bfloat16 autocast, JAX, TPUs, NVIDIA A100/H100) lean heavily on BF16 for exactly this reason: it often removes the need for loss scaling and drops into FP32 recipes cleanly. The details still depend on hardware, optimizer, and framework: some setups keep FP32 master weights, and mixed-precision recipes vary, so treat “BF16 needs no loss scaling” as a common outcome, not a guarantee.
For inference, the calculation shifts. There’s no backward pass and no tiny gradients to underflow, so FP16’s extra mantissa bits can give marginally higher-quality outputs on bounded, known weights. That is why a common rule of thumb is BF16 for training, FP16 (or smaller) for serving - a useful default, not a law: the best serving format depends on the model, the kernels, and how much accuracy the deployment can spare.
A quick terminology note: what we mean by “activations”. In classic deep-learning usage, the word activation means a non-linearity (ReLU, GELU, sigmoid). In quantization literature it gets overloaded - here “activation” means the input tensor flowing into a layer at inference time. For a linear layer $y = Wx$, $W$ is the weight matrix (static, learned during training) and $x$ is the activation (dynamic, input-dependent). When the rest of this article talks about “activation-aware methods” or “calibration activations,” it means those runtime input values flowing into the layer being quantized - not the non-linearity itself. The two are usually related (the input was typically produced by a previous layer that did go through a non-linearity) but the naming overlap is unfortunate, and standard in the field.
A tiny worked example
To make this concrete, take $\pi \approx 3.1415926$. Both formats encode it as:
1
2
3
FP16:  0 | 10000     | 1001001000   →  3.140625    (error ≈ 0.000968)
BF16:  0 | 10000000  | 1001001      →  3.140625    (error ≈ 0.000968)
       S | exponent  | mantissa
For $\pi$ specifically, both produce the same approximation (3.140625) because the bits beyond position 7 in the mantissa happen to round to zero in both formats. But for something like $10^{30}$, BF16 represents it fine (it sits comfortably under BF16’s $\approx 3.4\times10^{38}$ ceiling) while FP16 overflows to infinity (its ceiling is only 65,504). The day-to-day workloads of training look more like the second case than the first.
Why This Matters for Quantization
Notice the pattern in the chart above: every step down the ladder is a deliberate exchange of bits for either range or precision (or both). FP32 → BF16 sacrificed mantissa bits. BF16 → FP8 E5M2 sacrificed more mantissa. FP8 → INT8 sacrificed the exponent itself, collapsing onto a fixed-step grid with no dynamic range at all.
Quantization is the same game played one or two rungs further down. We compress FP16/BF16 weights into INT8, INT4, or even fewer bits - and we have to make smart choices about where on the number line we place our few remaining levels, because at 4 bits we only get 16 of them to cover the entire weight distribution. How we pick those levels, and how we decide which weights and activations get compressed in the first place, is the design space the rest of this article maps out.
The Landscape of LLM Quantization
To navigate the zoo of quantization acronyms (GPTQ, AWQ, QLoRA, SmoothQuant), we must map them across three distinct architectural axes: The Math, The Target, and The Timing.
AXIS 1: The Math (How do we map the numbers?)
This defines the physical shape of the “buckets” we use to squash floating-point numbers into smaller bit representations.
1. Linear (Uniform) Quantization
- The Concept: The integer buckets are spaced equally apart.
- Pros: Hardware loves it. GPUs have dedicated silicon (INT8 Tensor Cores) specifically designed to multiply evenly-spaced integers at blinding speeds.
- Cons: LLM weights are usually normally distributed (a Bell Curve). Most weights are near zero, and very few are at the extremes. Linear quantization wastes precious buckets on the empty “tails” of the distribution. Examples: Standard INT8, GGUF (often uses linear block-wise INT4).
2. Non-Linear (Distribution-based) Quantization
- The Concept: The buckets are not evenly spaced. Instead, they are crowded tightly together around 0.0 (where most the weights live) and spread further apart at the tails.
- The Star Player - NormalFloat (NF4): Invented for QLoRA, NF4 places its 16 levels at the quantiles of a standard Gaussian, so that under a normal-distribution assumption each bucket is equally probable (holds roughly the same share of weights). It is information-theoretically motivated rather than an exact per-bucket count on real data - the next article unpacks how and why.
- Pros: Incredible accuracy preservation at extremely low bit-rates (4-bit).
- Cons: Hardware hates it. We cannot do matrix multiplication on NF4 numbers. We must de-quantize them back to FP16 in the GPU’s SRAM right before multiplication, meaning it saves memory but doesn’t speed up compute.
AXIS 2: The Target (What are we quantizing?)
Are we quantizing just the model itself, the data flowing through it, or the memory it uses?
1. Weight-Only Quantization (WOQ)
- Standard formats: W8A16, W4A16 (Weight in 4-bit, Activations stay in 16-bit Float).
- Why do it? In autoregressive generation (batch size = 1), compute is fast, but moving weights from VRAM is slow (The Memory Bandwidth Wall). By only shrinking the weights, we solve the bottleneck.
- Algorithms:
- GPTQ: Looks at the Second-Order derivative (the Hessian matrix). If it quantizes a weight and causes a rounding error, it mathematically updates the unquantized weights next to it to compensate for the error.
- AWQ: Uses a calibration dataset to find the small fraction of weight channels that matter most for the activations, then protects them with an equivalent scaling transformation (scale the salient weights up, scale the matching activations down, so the product is unchanged) before quantizing. Crucially, it does not leave those channels at high precision in a mixed-precision model - the whole weight tensor still ends up in hardware-friendly low-bit form. (Full treatment in the AWQ article.)
2. Weight + Activation Quantization (W8A8)
- The Goal: Squash both the weights and the incoming tokens/activations into INT8.
- Why do it? If we have high batch sizes (serving 100 users at once), we are no longer memory-bound, we are compute-bound. W8A8 allows us to use INT8 Tensor Cores, doubling our raw mathematical throughput.
- The Solution (SmoothQuant): Remember the “Outlier Crisis”? Activations have massive outliers. SmoothQuant uses a genius math trick: it mathematically divides the activation outliers by a scale factor, and multiplies the corresponding weights by that exact same scale factor. It “migrates” the difficulty from the activations into the weights, making both smooth enough to safely quantize to INT8.
3. KV-Cache Quantization
- The Problem: In long-context models (e.g., Gemini’s 1M context or Claude’s 200K), the weights aren’t the problem. The KV Cache (the memory storing the Keys and Values of the past conversation) grows so massively it crashes the GPU.
- The Solution: Algorithms like KIVI or FlashInfer quantize the KV cache down to 2-bit or 4-bit on the fly.
AXIS 3: The Timing (When do we quantize?)
1. Post-Training Quantization (PTQ)
- The Concept: The model is fully trained in FP16. We download it, run a script for an hour (using GPTQ, AWQ, or EXL2), and squash it.
- Pros: Fast, cheap, requires no massive compute clusters. This is the industry standard for deployment.
2. Quantization-Aware Training (QAT)
- The Concept: We simulate the low-precision arithmetic during training itself. Fake-quantization nodes round the weights (and often activations) on the forward pass, while gradients flow through in full precision (via a straight-through estimator), so the model learns weights that are robust to being quantized at deployment. QAT targets the model’s own low-precision behavior, which is what separates it from the next category.
3. Quantized PEFT: QLoRA (a common point of confusion)
- The Concept: QLoRA is frequently filed under QAT, but it is really parameter-efficient fine-tuning on top of a quantized base. We freeze the massive base model in 4-bit (NF4) and attach tiny 16-bit LoRA “adapter” layers on the side; during the forward pass the 4-bit weights are dequantized to compute in higher precision, and only the 16-bit adapters are trained. The base model’s low precision is never itself optimized - it is a frozen, memory-saving container - which is exactly why this is not QAT. What it buys us is enormous: fine-tuning a 70B model on a single consumer GPU. (The LoRA/QLoRA article covers the mechanics.)
4. Extreme QAT (The 1-Bit Era)
- The Frontier (BitNet / 1.58b): Researchers are now training LLMs from scratch where every weight is strictly -1, 0, or 1.
- What actually changes: When a weight is only -1, 0, or +1, multiplying an activation by it degenerates into a sign flip, a skip, or a pass-through - so on compatible kernels many weight multiplications become sign/add operations. The computation is not multiplication-free, though: activations are still higher precision, the layer is still a dot product, and the partial sums are still accumulated in a wider dtype. It is a genuinely different cost profile, but claims that it “ends matrix multiplication” or upends any particular vendor are premature - the accumulation and memory-movement work does not vanish.
A Primer on the Affine Linear Quantization
Affine linear quantization converts high-precision floating-point values into low-precision integers using a simple linear mapping. Instead of storing each value directly, we represent it using two parameters: a scale factor ($S$) and a zero-point ($Z$), that map the floating-point range to a discrete integer range.
The general formula to quantize a floating-point value ($W_{fp}$) into an integer ($W_{int}$) is:
\[W_{int} = \text{clamp}\left( \text{round}\left( \frac{W_{fp}}{S} \right) + Z, \ Q_{min}, \ Q_{max} \right)\]Where:
- $Q_{min}$ and $Q_{max}$ are the absolute minimum and maximum boundaries of our target discrete integer space. For instance, if we are quantizing down to standard Signed INT8, $Q_{min} = -128$ and $Q_{max} = 127$. If we are quantizing to Unsigned UINT8, $Q_{min} = 0$ and $Q_{max} = 255$.
- The $\text{clamp}()$ function acts as a safety mechanism to prevent integer overflow. If a massive floating-point outlier causes our calculation to exceed our target range, the clamp function strictly bounds it. Anything higher than $Q_{max}$ simply becomes $Q_{max}$, and anything lower than $Q_{min}$ becomes $Q_{min}$. For reference, $\text{clamp}(x, y, z)$ mathematically restricts a value $x$ between a lower bound $y$ and an upper bound $z$, defined as: $\text{clamp}(x, y, z) = \max(y, \min(x, z))$.
To de-quantize it back during inference (so the GPU can accumulate the results):
\[W_{fp\_approx} = S \times (W_{int} - Z)\]This mapping can be implemented in two distinct flavors, depending on how we choose to align the floating-point values with the integer range: Symmetric and Asymmetric quantization.
Flavor 1: Symmetric Quantization (The Math)
In symmetric quantization, we force the floating-point range to be perfectly mirrored around zero. We do this by finding the maximum absolute value in the tensor and using it as the symmetric boundary $[-W_{max}, +W_{max}]$.
The Formulation
- Scale Factor ($S$): We divide our symmetric floating-point maximum by our maximum integer bucket.
- Zero-Point ($Z$): Because the range is perfectly centered on zero, the zero-point is strictly defined as $0$.
The Justification
By mathematically guaranteeing that $Z = 0$, symmetric quantization eliminates an entire term during matrix multiplication. Computing $X \times W$ on the GPU is vastly faster because the Tensor Cores don’t have to constantly add and subtract a zero-point offset during the millions of dot-product operations.
The Example
Let’s say a layer’s weights range from $-3.0$ to $+5.0$. We want to quantize to Signed INT8 (range $[-127, 127]$).
- Find Maximum: $\max(\lvert -3.0 \rvert, \lvert 5.0 \rvert) = 5.0$. Our symmetric range is artificially forced to $[-5.0, +5.0]$.
- Calculate Scale ($S$): $S = \frac{5.0}{127} \approx 0.03937$.
- Calculate Zero-Point ($Z$): $Z = 0$.
- Quantize a value ($3.5$): $W_{int} = \text{round}\left(\frac{3.5}{0.03937}\right) + 0 = 89$.
Notice the drawback: The real data only went down to $-3.0$, but we reserved integer buckets all the way down to $-5.0$. We wasted a portion of the negative INT8 buckets.
Flavor 2: Asymmetric Quantization (The Math)
In asymmetric quantization, we map the exact, unmanipulated minimum and maximum of the floating-point data to the absolute minimum and maximum of the integer range.
The Formulation
- Scale Factor ($S$): We divide the entire continuous range by the entire discrete range.
- Zero-Point ($Z$): We must ensure that a floating-point $0.0$ maps to a precise, whole integer.
Two conditions are hiding in that formula. Representing $0.0$ exactly only makes sense if the calibrated real range actually includes zero (if the data is $[10.5, 20.0]$, there is no real zero to map). And the computed $Z$ is both rounded to an integer and clamped into the legal code range $[Q_{min}, Q_{max}]$, so on a lopsided range it lands on the nearest legal code rather than a mathematically exact point. Exact-zero representation matters because a genuine zero (from padding or ReLU) should not drift to a nonzero value after quantization.
The Justification
Asymmetric quantization doesn’t waste any integer buckets. It tightly hugs the data distribution. This is absolutely critical for data that is inherently skewed or one-sided (like activation functions such as ReLU, which output only positive numbers).
The Example
Let’s use the exact same data range: $-3.0$ to $+5.0$. We want to quantize to Unsigned UINT8 (range $[0, 255]$).
- Calculate Scale ($S$): $S = \frac{5.0 - (-3.0)}{255 - 0} = \frac{8.0}{255} \approx 0.03137$. (Notice this scale is smaller than the symmetric one, meaning higher precision).
- Calculate Zero-Point ($Z$): $Z = \text{round}\left( 0 - \frac{-3.0}{0.03137} \right) = \text{round}(95.6) = 96$.
- Quantize a value ($0.0$): $W_{int} = \text{round}\left(\frac{0.0}{0.03137}\right) + 96 = 96$.
- Quantize a value ($5.0$): $W_{int} = \text{round}\left(\frac{5.0}{0.03137}\right) + 96 = 159 + 96 = 255$. (Maps perfectly to the top of the bucket).
The two schemes, side by side on the very same data, make the trade-off visual:
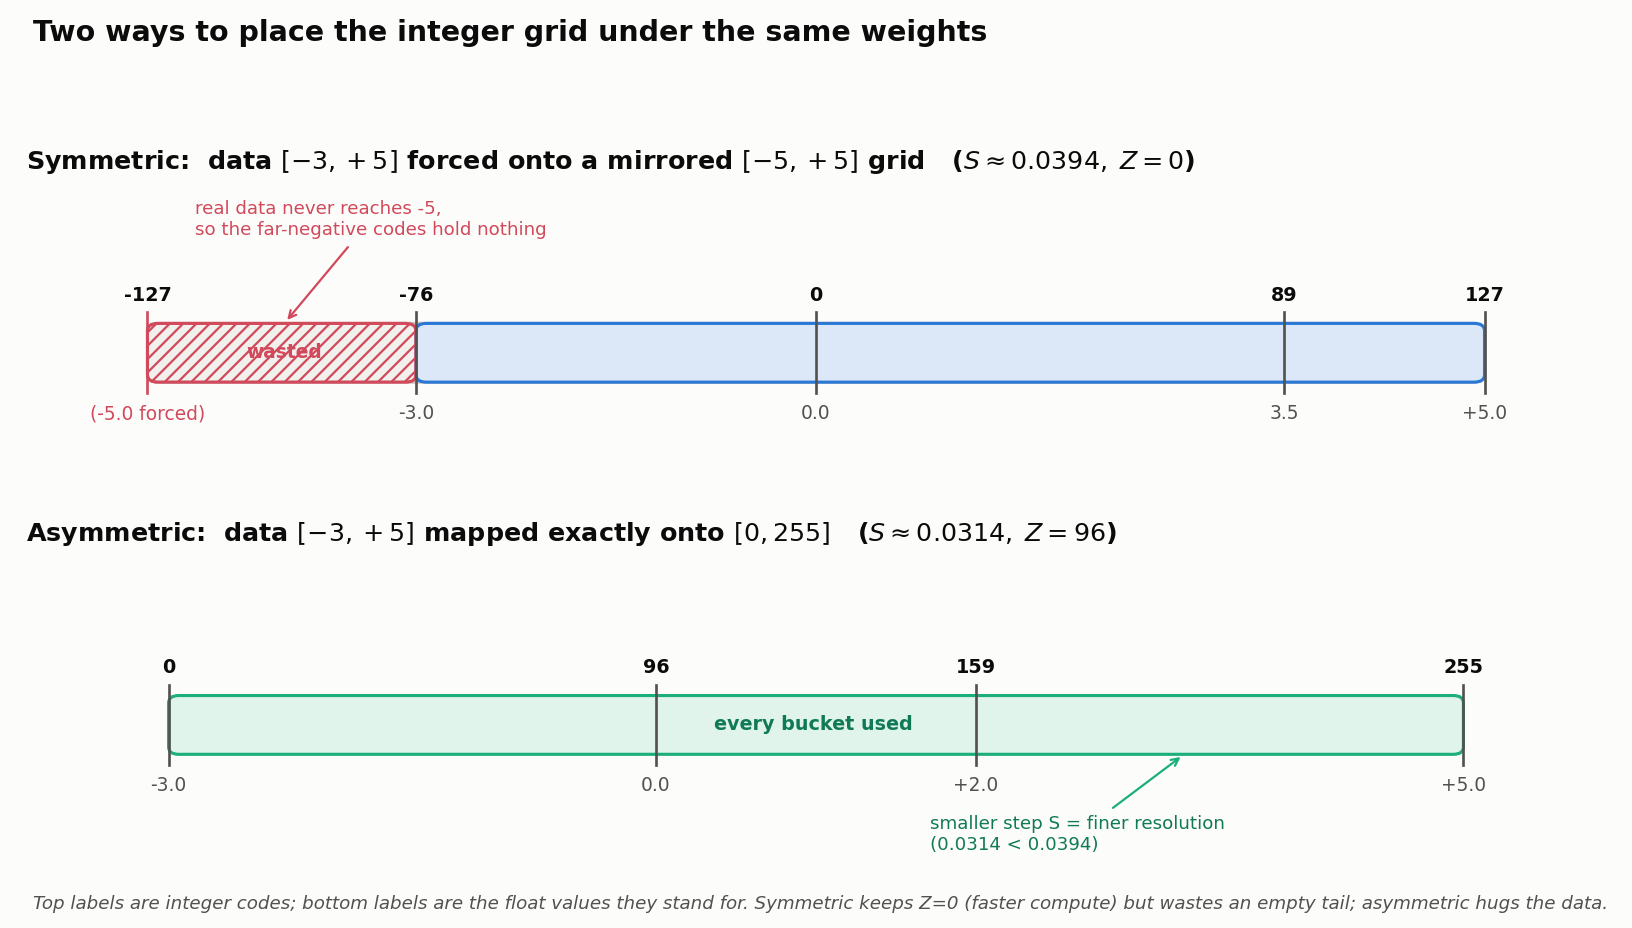
Symmetric buys compute speed ($Z=0$) at the cost of an unused tail; asymmetric spends a nonzero $Z$ to hug the data and win back resolution (the smaller scale). Which trade wins depends on the tensor’s actual distribution and the kernels available, which is the theme of the questions below.
Demystifying Symmetric and Asymmetric Quantization
Question 1: Weights vs. Activations
Is symmetric quantization more useful for weights while asymmetric quantization is more useful for activations?
Often, but as a tendency driven by measured distributions and kernel support, not an absolute rule keyed to the word “weight” or “activation.” A common pairing is W8A8 (Weight 8-bit, Activation 8-bit), and the reasoning goes:
- Why weights lean symmetric: Trained weight tensors are frequently roughly centered near zero (weight decay nudges them smaller, though it does not guarantee a clean, symmetric bell curve). When a tensor is close to zero-centered, symmetric quantization fits it with little waste, and it pins the zero-point at $Z=0$, which removes offset cross-terms and lets the matmul kernels run at full speed. That compute win is often the deciding factor, more than the exact shape of the distribution.
- Why activations often go asymmetric: The classic motivation is a strictly-positive output like ReLU (range $[0, 15.5]$), where symmetric quantization would pretend the range is $[-15.5, +15.5]$ and throw away half the buckets. But be careful: modern transformer activations are usually signed, not non-negative. Residual streams, LayerNorm outputs, and linear projections all produce negative values, and GELU/SiLU emit small negatives too. What actually makes activations hard is not one-sidedness but large outliers and their input-dependence, which is why the harder cases need per-token or per-channel schemes (and tricks like SmoothQuant), not merely “asymmetric because activation.”
The practical takeaway: pick symmetric vs asymmetric, and the granularity, from the tensor’s observed range and the kernels we can actually run - not from its name.
Question 2: Clarifying Symmetric Quantization
Does the float range surround 0.0? Can we use both signed/unsigned integers here? Why is it called symmetric?
The Float Range Concept In Symmetric Quantization, the real float values in our tensor might be skewed (e.g., -3.5 to +4.7). However, the algorithm ignores the minimum. It simply looks for the absolute maximum value: $\max(|-3.5|, |4.7|) = 4.7$. Then, it artificially forces the range to become perfectly mirrored around zero: $[-4.7, +4.7]$.
Signed vs. Unsigned Integers The defining property of symmetric quantization is not “the bits must be stored signed” - it is that the real value $0.0$ maps to the zero level of a code range that is centered on zero, so $Z = 0$. The natural container for that is a signed type (INT8: $-127$ to $+127$), and that is what implementations usually use. But signedness is a storage convention: the same centered levels can be packed into an unsigned field by adding a fixed offset (store $q + 128$, subtract it back before compute). So the precise statement is “symmetric means a zero-centered code range with $Z=0$,” not “symmetric forbids unsigned storage.”
Note: Standard INT8 goes from -128 to 127. To keep the levels perfectly mirrored around 0, symmetric schemes commonly drop the -128 bucket and use only -127 to 127.
Why is it called “Symmetric”? It is called Symmetric because both the float boundary and the integer boundary are mathematically mirrored around zero.
- Float boundary: $[-max, +max]$
- Integer boundary: $[-127, +127]$
Because both boundaries are perfectly centered on zero, $0.0$ float is guaranteed to equal $0$ integer. No offset ($Z=0$) is required.
Question 3: Clarifying Asymmetric Quantization
Does the float range start at 0.0? Can we use both signed/unsigned? Why is it called asymmetric?
The Float Range Concept The float range does not have to start at 0.0. It can be $[0.0, 9.37]$, but it can just as easily be $[-2.1, 5.8]$ or $[10.5, 20.0]$. In Asymmetric Quantization, the algorithm does not artificially manipulate the boundaries. It takes the exact min and max of the actual data and maps them exactly as they are.
Signed vs. Unsigned Integers We can use either, but Unsigned Integers (UINT8: 0 to 255) are heavily preferred. Since we are tightly mapping an arbitrary range (like $[-2.1, 5.8]$), it makes logical sense to map the absolute bottom (-2.1) to the absolute bottom integer bucket (0). If we used signed INT8, we would map -2.1 to -128. The math works exactly the same, but using 0 to 255 is easier for software engineers to debug.
Why is it called “Asymmetric”? It is called Asymmetric because the real data boundaries are not perfectly mirrored around zero, and therefore, the mapping is offset. If our range is $[-2.1, 5.8]$, 0.0 is not in the exact center of the data. Therefore, when we map it to integers, $0.0$-float will NOT map to $0$-int. It will map to some arbitrary integer offset like 68. Because $Z \neq 0$, the mapping has an asymmetric offset.
The Ultimate Summary Table
| Feature | Symmetric Quantization | Asymmetric Quantization |
|---|---|---|
| Mathematical Rule | $Z$ must equal $0$ | $Z$ can be any integer |
| Float Range Used | Artificially forced to [-max, +max] | Exact actual [min, max] |
| Integer Type | Strictly Signed (e.g., INT8) | Usually Unsigned (e.g., UINT8) |
| Best Used For | Weights (tend to sit near 0) | Activations (often skewed / outlier-heavy) |
| Compute Speed | Maximum (No offset math required) | Slower (Requires offset cross-terms) |
Two Choices We Have Been Quietly Assuming
Symmetric-versus-asymmetric is only one dial. Two more decide how well affine quantization actually works, and both later articles lean on them.
Granularity: how many scales do we compute? Everything above used one scale and zero-point for a whole tensor (per-tensor). That is cheapest but most fragile: a single outlier channel stretches the range for everyone. The alternatives trade metadata for accuracy:
- Per-channel / per-row: a separate $S$ (and $Z$) for each output channel, so one wild channel no longer widens the grid for the rest.
- Per-group / block-wise: split each row into fixed blocks (say 64 or 128 weights) and give each its own scale. This is what 4-bit formats like NF4 and GGUF actually do, and it is the main reason 4-bit models stay usable.
Finer granularity fits the data better but stores more scales, which brings us to the honest accounting of cost.
Effective bits, not nominal bits. A “4-bit” model is not exactly $4\times$ smaller than FP16. Every group carries a scale (and maybe a zero-point), packing wastes some bits, and codebooks add a table. With a 16-bit scale per 64-weight block, those 64 weights cost $64\times4 + 16 = 272$ bits, about $4.25$ effective bits, not 4. Speed is even less direct: weight-only 4-bit helps only because decode is memory-bandwidth-bound, and the win survives only if the dequantize-then-multiply kernel is fast enough on the target hardware. Nominal bit-width sets the ceiling; kernels, granularity, and batching decide what we actually get.
With the affine machinery, the granularity dial, and honest cost accounting in hand, the series can go up a level. The next article leaves the evenly-spaced grid behind for non-linear codebooks like NF4, and from there we reach the two workhorse post-training methods, GPTQ and AWQ.