Venturing into the Isolation Forest
Most models learn what normal looks like and then measure how far a point sits from it: a distance, a density, a reconstruction error. Isolation Forest takes the opposite route. It never models normal behavior at all. It asks a simpler question, one random cut at a time: how hard is this point to isolate?
1. What Isolation Forest Detects
Isolation Forest is an unsupervised anomaly detector. It sees no labels during training. It only sees the data and looks for points that are easy to separate from everything else. The whole method rests on one assumption:
Anomalies are few and different, so they can be isolated from the rest of the data with fewer random splits than normal points.
This “few and different” premise is the method’s inductive bias, the assumption it is built on, not a definition that fits every real anomaly. Where it holds, isolation is fast. Where anomalies form tight clusters, or are unusual only relative to a local neighborhood, it can struggle - limits we return to near the end.
The contrast with the usual approaches is the point. Distance-based methods (like k-nearest-neighbors outlier scores) and density-based methods (like Local Outlier Factor) build an explicit picture of where the data lives and flag points that fall outside it. That picture is expensive in high dimensions and leans on a notion of distance that degrades as dimensions grow. Isolation Forest sidesteps both. It builds an ensemble of random partitions and reads off, for each point, how few cuts it took to fence that point into a region of its own. Short isolation, likely anomaly; long isolation, likely normal.
That intuition is often summarized as “anomalies have extreme feature values,” and frequently they do. But the mechanism is more general: a point can be quick to isolate because of an unusual combination of otherwise ordinary features, not only because a single feature is near its minimum or maximum.
2. Building One Isolation Tree
The forest is an ensemble of isolation trees (iTrees). Each tree is deliberately weak and random; the ensemble is what makes the score stable. We build one tree like this.
Draw a subsample
We do not feed a tree the whole dataset. We draw a random subsample of size $\psi$ (256 by default). This is the counter-intuitive heart of the algorithm, and Section 4 is devoted to why it works. For now, take it as given: each tree sees only $\psi$ points.
Split randomly until isolated
Unlike a decision tree, which searches for the best split to separate classes, an isolation tree takes any split to separate points. Starting from a root node holding all $\psi$ points, we recurse:
1
2
3
4
5
6
7
8
9
10
11
12
13
14
15
BuildTree(data, depth, height_limit):
    # Base cases -> make a leaf, and record how many points it holds
    if len(data) <= 1:                      return Leaf(size=len(data))
    if depth >= height_limit:               return Leaf(size=len(data))
    if data has no feature that can split:  return Leaf(size=len(data))

    # Otherwise, cut at random
    q = a randomly chosen feature that is NOT constant in data
    p = Uniform(min(data[q]), max(data[q]))          # random threshold

    left  = data[data[q] <  p]
    right = data[data[q] >= p]
    return Node(q, p,
                BuildTree(left,  depth + 1, height_limit),
                BuildTree(right, depth + 1, height_limit))
Three details matter and are easy to get wrong.
- The height limit is $\ell = \lceil \log_2 \psi \rceil$. For $\psi = 256$ this is exactly 8, not approximately. We stop there because a point still unisolated by that depth is almost certainly normal, and growing deeper wastes computation.
- A leaf can hold many points. Because of the height limit, growth routinely stops with several points still sharing a node. We store that count; Section 3 needs it.
- A constant feature cannot be split. If a randomly chosen feature has the same min and max in the current node, no threshold exists, even when the points differ on other features. The algorithm draws another feature that can split; if none can, the node becomes a leaf. “All rows identical” is only the extreme case of this.
The result is a height-limited isolation tree, not a fully grown one. Anomalies tend to end up in leaves near the root, because a value in a sparse region is easy for a random cut to peel off early. Normal points tend to end up deep, because they are packed together and take many cuts to separate.
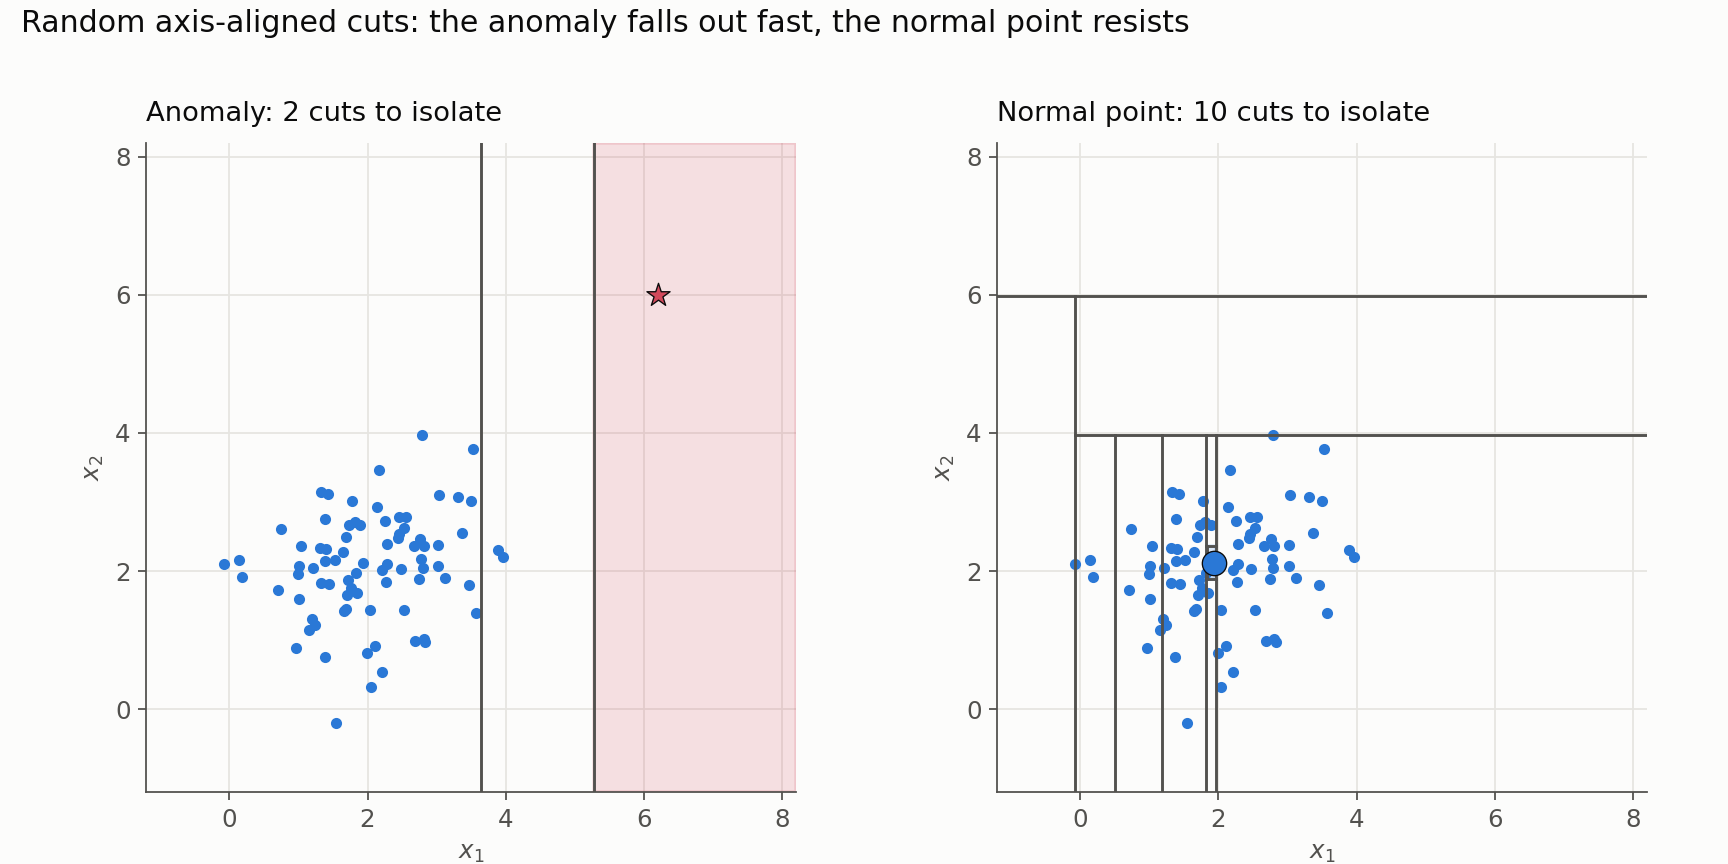
The picture is the whole idea in one frame. The same random cutting process fences the anomaly into a cell of its own almost immediately, while the point buried in the dense cluster survives cut after cut. Path length is that count of cuts.
3. From Leaf Depth to Anomaly Score
A single tree gives each point a path length: how deep we had to go to reach its leaf. Turning that into a comparable score takes three steps.
Step 1: Path length, with the leaf-size correction
The raw depth $e$ is the number of edges from the root to the point’s leaf. But if growth stopped early with $m$ points still sharing that leaf, those $m$ points were not actually isolated. We add the expected number of extra splits it would take to separate one point among $m$, written $c(m)$:
\[h(x) = e + c(m).\]Without this correction, a point dumped into a crowded leaf just because the tree hit its height limit would look far more anomalous than it is. For a true singleton, $c(1) = 0$ and $h(x)$ is simply the depth.
Step 2: The normalizer $c(\psi)$
A path of length 8 is “short” in a large sample and “long” in a tiny one, so we need a yardstick: the average path length of a random point. The authors model it as the average depth of an unsuccessful search in a Binary Search Tree, which for a sample of size $k$ is:
\[c(k) = 2H(k-1) - \frac{2(k-1)}{k},\]where $H(i) \approx \ln(i) + 0.5772\ldots$ (the harmonic number). Guarding the small cases:
\[c(k) = \begin{cases} 2H(k-1) - \dfrac{2(k-1)}{k}, & k > 2,\\[4pt] 1, & k = 2,\\[4pt] 0, & k \le 1. \end{cases}\]The same $c(\cdot)$ does both jobs: $c(m)$ corrects a truncated leaf of $m$ points, and $c(\psi)$ is the tree-wide baseline. One subtlety is where the intuitive account usually goes wrong: the size in the normalizer is $\psi$, the per-tree subsample size, not the full training-set size. If the data has 10,000 rows but each tree sees 256, we normalize with $c(256)$, never $c(10{,}000)$. We keep $m$ for a leaf’s temporary count and $N$ for the full dataset.
Step 3: Average and score
One tree is noisy, so we average the path length for $x$ over the whole forest of $T$ trees, giving $E(h(x))$, then map it to a score:
\[s(x, \psi) = 2^{-\frac{E(h(x))}{c(\psi)}}.\]The exponent is a ratio, so $s$ lands in $(0, 1]$ regardless of scale. Reading it at the extremes:
- Strongly isolated: $E(h(x)) \rightarrow 0$, so $s \rightarrow 2^{0} = 1$. Scores near 1 flag likely anomalies.
- At the baseline: $E(h(x)) \approx c(\psi)$, so $s \approx 2^{-1} = 0.5$. Here $0.5$ is the normalization baseline, the score of a point whose depth matches a random point’s.
- Deeply interior: $E(h(x)) > c(\psi)$, so $s$ falls below 0.5.
Two cautions the quick version glosses over. First, $0.5$ is a baseline, not a badge that reads “normal point.” The paper’s sharper reading is collective: if every point scores near 0.5, the sample has no clear isolation-based anomaly structure at that scale. A genuine normal point in data that does contain anomalies usually scores somewhat below 0.5, not exactly at it. Second, finite forests with height-truncated trees rarely push normal scores close to 0; they occupy a narrower empirical band. Treat $s$ as a ranking, not a calibrated probability, and do not adopt a universal 0.5 cutoff. The operating threshold is a separate decision we take up in Section 5.
A Worked Example: One Tree, One Score
Formulas land better with numbers. Take eight one-dimensional points: seven normals clustered near 10, and one obvious anomaly at 23.
\[X = \{9.7,\ 9.9,\ 10.0,\ 10.1,\ 10.2,\ 10.3,\ 10.4,\ 23.0\}.\]We use the whole set as one tree’s subsample, so $\psi = 8$ and the height limit is $\ell = \lceil \log_2 8 \rceil = 3$. We will need $c(2) = 1$, $c(3) = 2H_2 - \tfrac{4}{3} = 1.667$, and $c(8) = 2H_7 - \tfrac{14}{8} = 3.436$.
Trace one random tree. Suppose the random thresholds come out as follows:
- Root (depth 0), all 8 points, range $[9.7, 23.0]$. A random cut at $p = 16.4$ sends the anomaly 23.0 to the right and the seven normals to the left. The anomaly is isolated at depth 1: $h(23.0) = 1$.
- Left node (depth 1), the seven normals, range $[9.7, 10.4]$. A cut at $p = 9.8$ splits off 9.7 alone. It is isolated at depth 2: $h(9.7) = 2$.
- Next node (depth 2), the six middle points, range $[9.9, 10.4]$. A cut at $p = 10.15$ produces two groups of three, both at depth 3, the height limit. Neither is a singleton, so each is a truncated leaf with $m = 3$. Every point in them gets $h = 3 + c(3) = 3 + 1.667 = 4.667$.
In this one tree the anomaly isolates in a single cut, while the crowded normals need the $c(3)$ correction. That correction is exactly what keeps the height-limited normals from looking falsely anomalous.
Average over a forest. One tree is random; a forest smooths it out. Building 2,000 such trees on these eight points and averaging gives the path lengths below, which we turn into scores with $s = 2^{-E(h)/c(8)}$ and $c(8) = 3.436$:
| Point | $E(h(x))$ | $s = 2^{-E(h)/c(8)}$ |
|---|---|---|
| 23.0 (anomaly) | 1.05 | 0.808 |
| 9.7 | 3.10 | 0.535 |
| 10.4 | 3.62 | 0.482 |
| 10.3 | 4.37 | 0.414 |
| 9.9 | 4.28 | 0.422 |
| 10.2 | 4.69 | 0.388 |
| 10.0 | 4.63 | 0.393 |
| 10.1 | 4.74 | 0.384 |
The anomaly scores 0.81, far clear of the normals at 0.38 to 0.54. The two edge points of the cluster (9.7 and 10.4) score highest among the normals, which is the seed of the swamping effect we discuss shortly.
Now the same points through scikit-learn, and the reason the orientation warning above matters:
1
2
3
4
5
6
7
8
9
10
import numpy as np
from sklearn.ensemble import IsolationForest

X = np.array([9.7, 9.9, 10.0, 10.1, 10.2, 10.3, 10.4, 23.0]).reshape(-1, 1)
clf = IsolationForest(n_estimators=2000, max_samples=8,
                      contamination=1/8, random_state=0).fit(X)

clf.score_samples(X)      # lower  = more anomalous  (opposite of our s)
clf.decision_function(X)  # = score_samples - offset_
clf.predict(X)            # -1 outlier, +1 inlier
| Point | score_samples | decision_function | predict |
|---|---|---|---|
| 23.0 (anomaly) | -0.800 | -0.236 | -1 |
| 9.7 | -0.531 | 0.034 | +1 |
| 10.4 | -0.472 | 0.093 | +1 |
| 10.1 | -0.390 | 0.176 | +1 |
Line up the two tables. Our $s$ is highest for the anomaly (0.808); scikit-learn’s score_samples is lowest, most negative (-0.800). They are the same information with the sign flipped: score_samples is essentially $-s$. Sort the wrong way and the most normal points come back mislabeled as the “anomalies.” decision_function just shifts score_samples by the fitted offset_, and predict applies the sign of decision_function, flagging only 23.0 here because we told it contamination=1/8.
4. Why Subsampling Helps
We build each tree on a small subsample and ignore most of the data. With 10,000 points and $\psi = 256$, Tree 1 draws 256 points and ignores 9,744; Tree 2 draws a different 256; and so on. The draws are independent, so subsamples overlap freely - “a different 256” does not mean a disjoint chunk, and some points may never be drawn by any tree. Two questions follow: why is throwing away data good, and how do we still score the points we never trained on?
Reason 1: Reducing swamping and masking
Two classic failure modes of anomaly detection have precise, distinct meanings, and stating them correctly matters because subsampling affects each.
- Masking (false negatives): anomalies hide one another. When a group of anomalies is large or cohesive enough to look like its own little cluster, its members stop isolating quickly and pick up long paths. They mask each other’s abnormality.
- Swamping (false positives): normal points get flagged because they sit near anomalies, or in a sparse region influenced by them. A normal point on the boundary of an anomalous cluster can get a short path and be wrongly ranked as an outlier. The two edge points in our worked example are exactly this kind of borderline case.
Large samples aggravate both. A real anomaly buried among thousands of neighbors needs many cuts to peel out, so it looks normal (a masking-style miss), and a dense clump of anomalies looks like a legitimate cluster. Subsampling helps with both, as a probabilistic tendency rather than a guarantee. Draw only 256 points and a lone anomaly likely sits with a handful of neighbors, so one or two cuts isolate it. A 50-strong anomaly cluster likely contributes only one or two points to any given subsample, stripping away the “gang” that made its members look normal. This is an empirical advantage reported in the original paper, not a theorem.
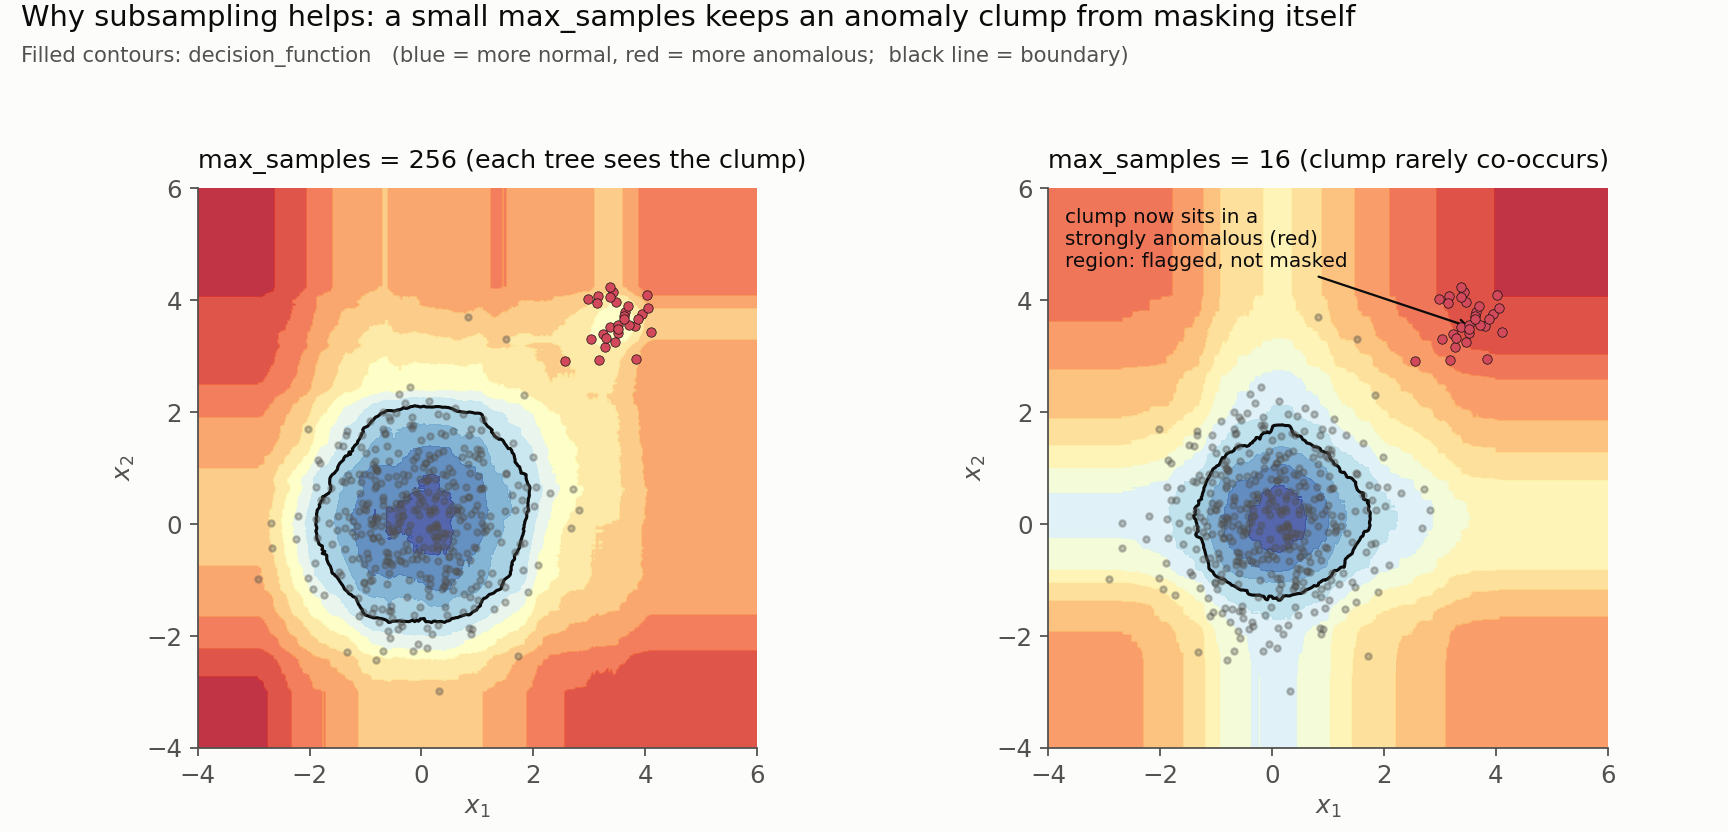
The effect is visible in the decision surface. With a large max_samples, every tree sees the whole 30-point clump and partly excuses it as its own dense region. Shrink the subsample to 16 and the clump rarely co-occurs with itself inside a tree, so its members isolate quickly and the region reads as strongly anomalous.
Reason 2: Generalization over memorization
Isolation Forest does not memorize the data like a lookup table. It builds an ensemble of random axis-aligned partitions, and averages them into a picture of which regions are dense and which are empty. To learn where the dense region is, we do not need every point; a few hundred sampled points sketch it, and a hundred such sketches, averaged, agree on where “normal” lives. Adding more points to a single tree mostly adds redundant confirmation of the dense center while making anomalies harder to isolate.
Scoring points the model never saw
Training and scoring are separate passes. We train $T$ trees on their subsamples, then push all $N$ points through the finished forest, one at a time, to get each point’s path length in every tree. A point never used to train Tree 1 can still be dropped down Tree 1: it follows the split rules and lands in some leaf. If it lands in a sparse region across most trees, it scores as an anomaly whether or not it was ever a training point.
How many points get left out entirely? For $N = 10{,}000$, $\psi = 256$, and $T = 100$ independently drawn trees, the chance a given row is never selected is:
\[\left(1 - \frac{256}{10{,}000}\right)^{100} \approx 0.075.\]So roughly 7.5% of rows are absent from every tree in expectation, and the forest still scores all 10,000. That is a sharper statement than “some rows may never be used.”
With the mechanics, the score, and the reason for subsampling in hand, the remaining questions are practical: how to turn a ranking into a decision, how to run and evaluate the model without fooling ourselves, and where the method quietly fails.
5. Thresholding and Evaluation
The forest produces a ranking, not a verdict. Nothing in the score formula says where anomalies stop and normals begin; that cutoff is a separate, deliberate choice.
In scikit-learn, contamination makes the choice. It is easy to misread as “the fraction of anomalies the model discovers.” It is not. It is an assumed anomaly rate that fixes the offset_ so that roughly that fraction of the training data falls on the outlier side of decision_function. Set it too high and normal points get swamped; too low and real anomalies pass as inliers. The ranking underneath is unchanged either way.
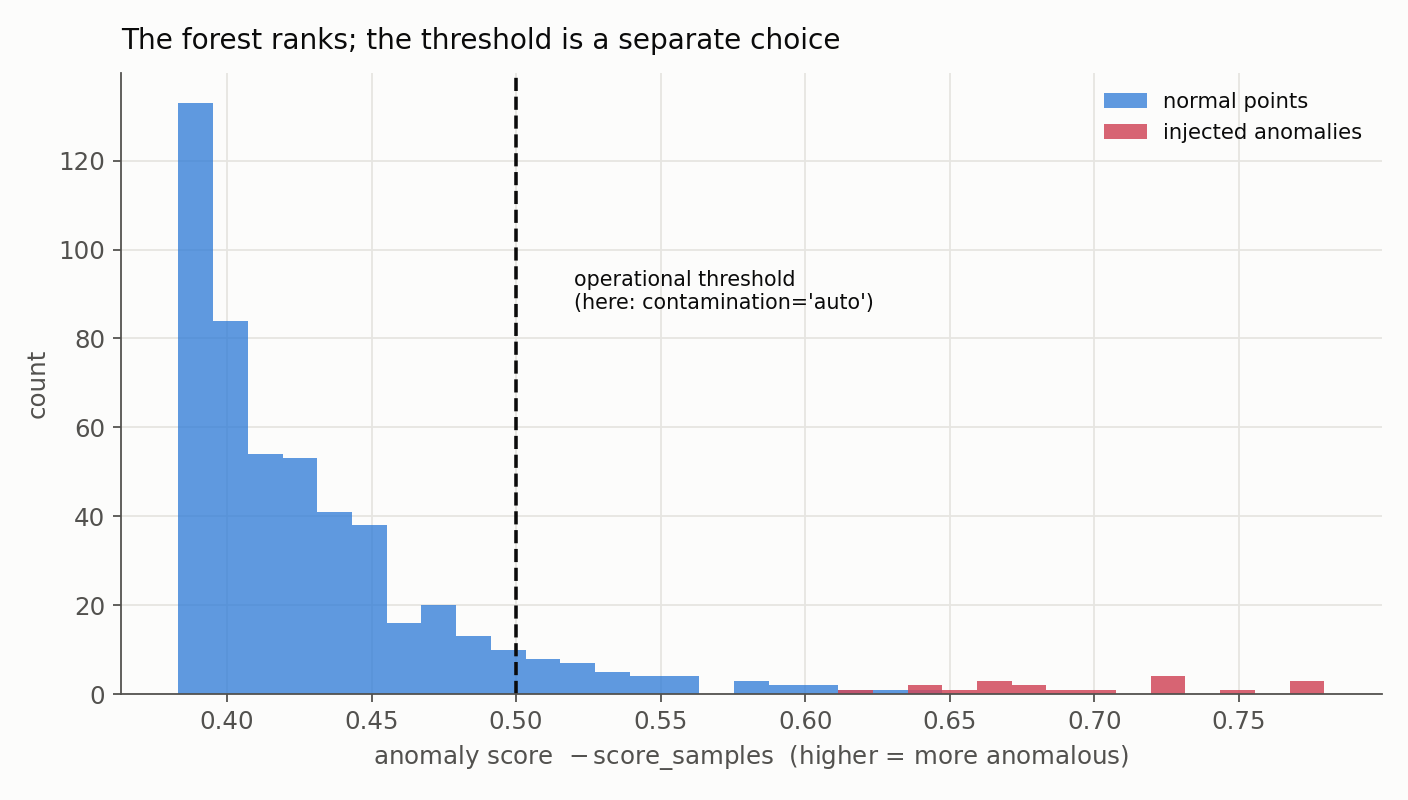
The histogram shows why the threshold is its own decision. The forest cleanly pushes the injected anomalies into a right tail, but exactly where to drop the cutoff, and how many borderline normal points to accept as false positives, is a judgment the score cannot make for us.
When the true rate is unknown, three defensible strategies:
- Tune on labels. If a labeled validation set exists, pick the threshold that best trades precision against recall for the actual cost of a miss versus a false alarm.
- Budget the alerts. Take the top $k$ scores that investigators can realistically review. This turns an unknowable rate into a capacity decision.
- Anchor to a baseline. Set a quantile or stability-based threshold on a representative clean sample, then monitor for drift as new data arrives.
The framing also depends on the data. Fitting on contaminated historical data (anomalies already mixed in) is different from novelty detection on a mostly clean baseline, where new anomalies arrive later. The second is closer to what many monitoring systems actually do.
For evaluation, accuracy is worse than useless when anomalies are rare: a model that flags nothing scores 99% on a 1%-anomaly set. Prefer precision-recall curves and average precision, precision at $k$, and recall at a review budget. Where deployment has time or entity boundaries (fraud, equipment, security), use temporal or group-aware splits, not random ones, so that a future anomaly is never predicted from its own past. Finally, the forest is stochastic: more trees stabilize the scores at a compute cost, and when rankings near the threshold matter, report their variability across random seeds.
6. Practical Implementation
A minimal, correct scikit-learn pipeline, with the parameters that actually move the needle:
1
2
3
4
5
6
7
8
9
10
11
12
13
14
15
from sklearn.ensemble import IsolationForest

iso = IsolationForest(
    n_estimators=200,       # more trees -> steadier scores, more compute
    max_samples=256,        # psi: the per-tree subsample size
    contamination="auto",   # sets the predict / decision_function threshold
    max_features=1.0,       # fraction of features considered per tree
    bootstrap=False,        # subsample without replacement
    random_state=0,         # reproducibility (the method is stochastic)
    n_jobs=-1,              # trees are embarrassingly parallel
).fit(X_train)

scores = -iso.score_samples(X_test)   # flip sign: higher = more anomalous
labels = iso.predict(X_test)          # -1 outlier, +1 inlier
order  = scores.argsort()[::-1]       # most anomalous first
Two habits prevent most mistakes. Fix the sign once, as above, so “higher is more anomalous” holds everywhere downstream. And sort in the right direction for whichever method is in hand: score_samples and decision_function are both lower-is-worse.
On preprocessing, Isolation Forest is gentler than distance-based methods. Because split thresholds are drawn uniformly between a feature’s min and max, any positive affine rescaling of a numeric feature leaves the partition structure unchanged: standardization is not required. What still matters is the rest of the data hygiene:
- Missing values need imputation; the split rule has no branch for
NaN. - Categoricals need numeric encoding, but note that one-hot encoding inflates the feature count and reshapes the random feature-selection distribution.
- Identifiers, timestamps, and leakage features should be removed or handled deliberately; a random row ID is a perfect, meaningless “anomaly” generator.
- Preprocessing must match between fitting and scoring, or the trees interpret the two differently.
7. Strengths, Limitations, and Alternatives
Strengths. No labels required, no pairwise distance matrix, bounded and cheap trees, scoring that scales linearly in the data, and the ability to carve nonlinear (if axis-aligned) normal regions. For a fast first pass on unlabeled tabular data, it is hard to beat.
Limitations. The threshold is an external decision, not a model output. Because standard cuts are axis-aligned, boundaries oblique to the feature axes are approximated by a staircase, which can distort scores. Many irrelevant features dilute the random split selection and slow detection. Performance is sensitive to the assumed contamination and to drift between training and scoring. Clustered anomalies (masking) and purely local anomalies, unusual only against a nearby group, are genuinely hard for it. And the score explains that a point is isolated, not why.
Alternatives, each with a different bias:
- Local Outlier Factor compares a point’s local density to its neighbors’, catching local anomalies that Isolation Forest misses, at a higher computational cost.
- One-Class SVM fits a boundary around the normal region and is flexible through kernels, but is more sensitive to parameters and scale.
- Elliptic Envelope (robust covariance) is strong when the normal data is roughly Gaussian, and weak when it is not.
- Autoencoders and other reconstruction methods shine on high-dimensional structured data (images, sequences) where reconstruction error is meaningful.
- Extended Isolation Forest replaces axis-aligned cuts with random oblique hyperplanes, addressing the staircase artifact. It is a follow-up, not part of the original algorithm.
Closing Perspective
Isolation Forest earns its popularity by inverting the usual instinct. Instead of modeling normality and measuring deviation from it, it partitions at random and lets anomalies fall out as the points that were quick to isolate. The mechanics are simple, but the details that make it correct are easy to drop: the $c(m)$ correction for crowded leaves, normalization by the subsample size $\psi$ rather than the full data, and the sign flip between the paper’s score and the library’s. Get those right, treat the score as a ranking rather than a probability, and choose the threshold as a deliberate decision, and it is a fast, dependable first tool for unlabeled anomaly detection.
Resources
- Liu, F. T., Ting, K. M., & Zhou, Z.-H. (2008). Isolation Forest. 2008 Eighth IEEE International Conference on Data Mining (ICDM), 413-422. DOI: 10.1109/ICDM.2008.17
- Liu, F. T., Ting, K. M., & Zhou, Z.-H. (2012). Isolation-Based Anomaly Detection. ACM Transactions on Knowledge Discovery from Data (TKDD), 6(1), Article 3.
- scikit-learn IsolationForest documentation